
Quilting A Large Quilt on A Domestic Machine
Quilting a large quilt on a domestic machine feels overwhelming but is totally possible! Here are some key things you should know to get started.
(This post contains affiliate links)

I know the quilt is big and your throat space is small, Rockstar, but you’ve got this!
In my experience, most people have a throat space between 5.5 and 7 inches wide, and while that is a snug squeeze, I’ve free motion quilted up to double size quilts in throat spaces this small. These tips come from those experiences. Don’t be afraid to tackle the big quilt— just take it one step, one block, one section at a time!
Video
In this video, I’m working on a Star Island quilt on a Singer Quantum Stylist 9960 with a 5.5 inch throat.
Tips & Tricks
(Note: In the step outs below, I’m quilting on a Juki J-150 QVP, and the quilt pictured is from Moda Bake Shop’s 2018 Summer QAL, the Choose Your Own Adventure QAL. Click here to visit the Moda Bake Shop and learn more)
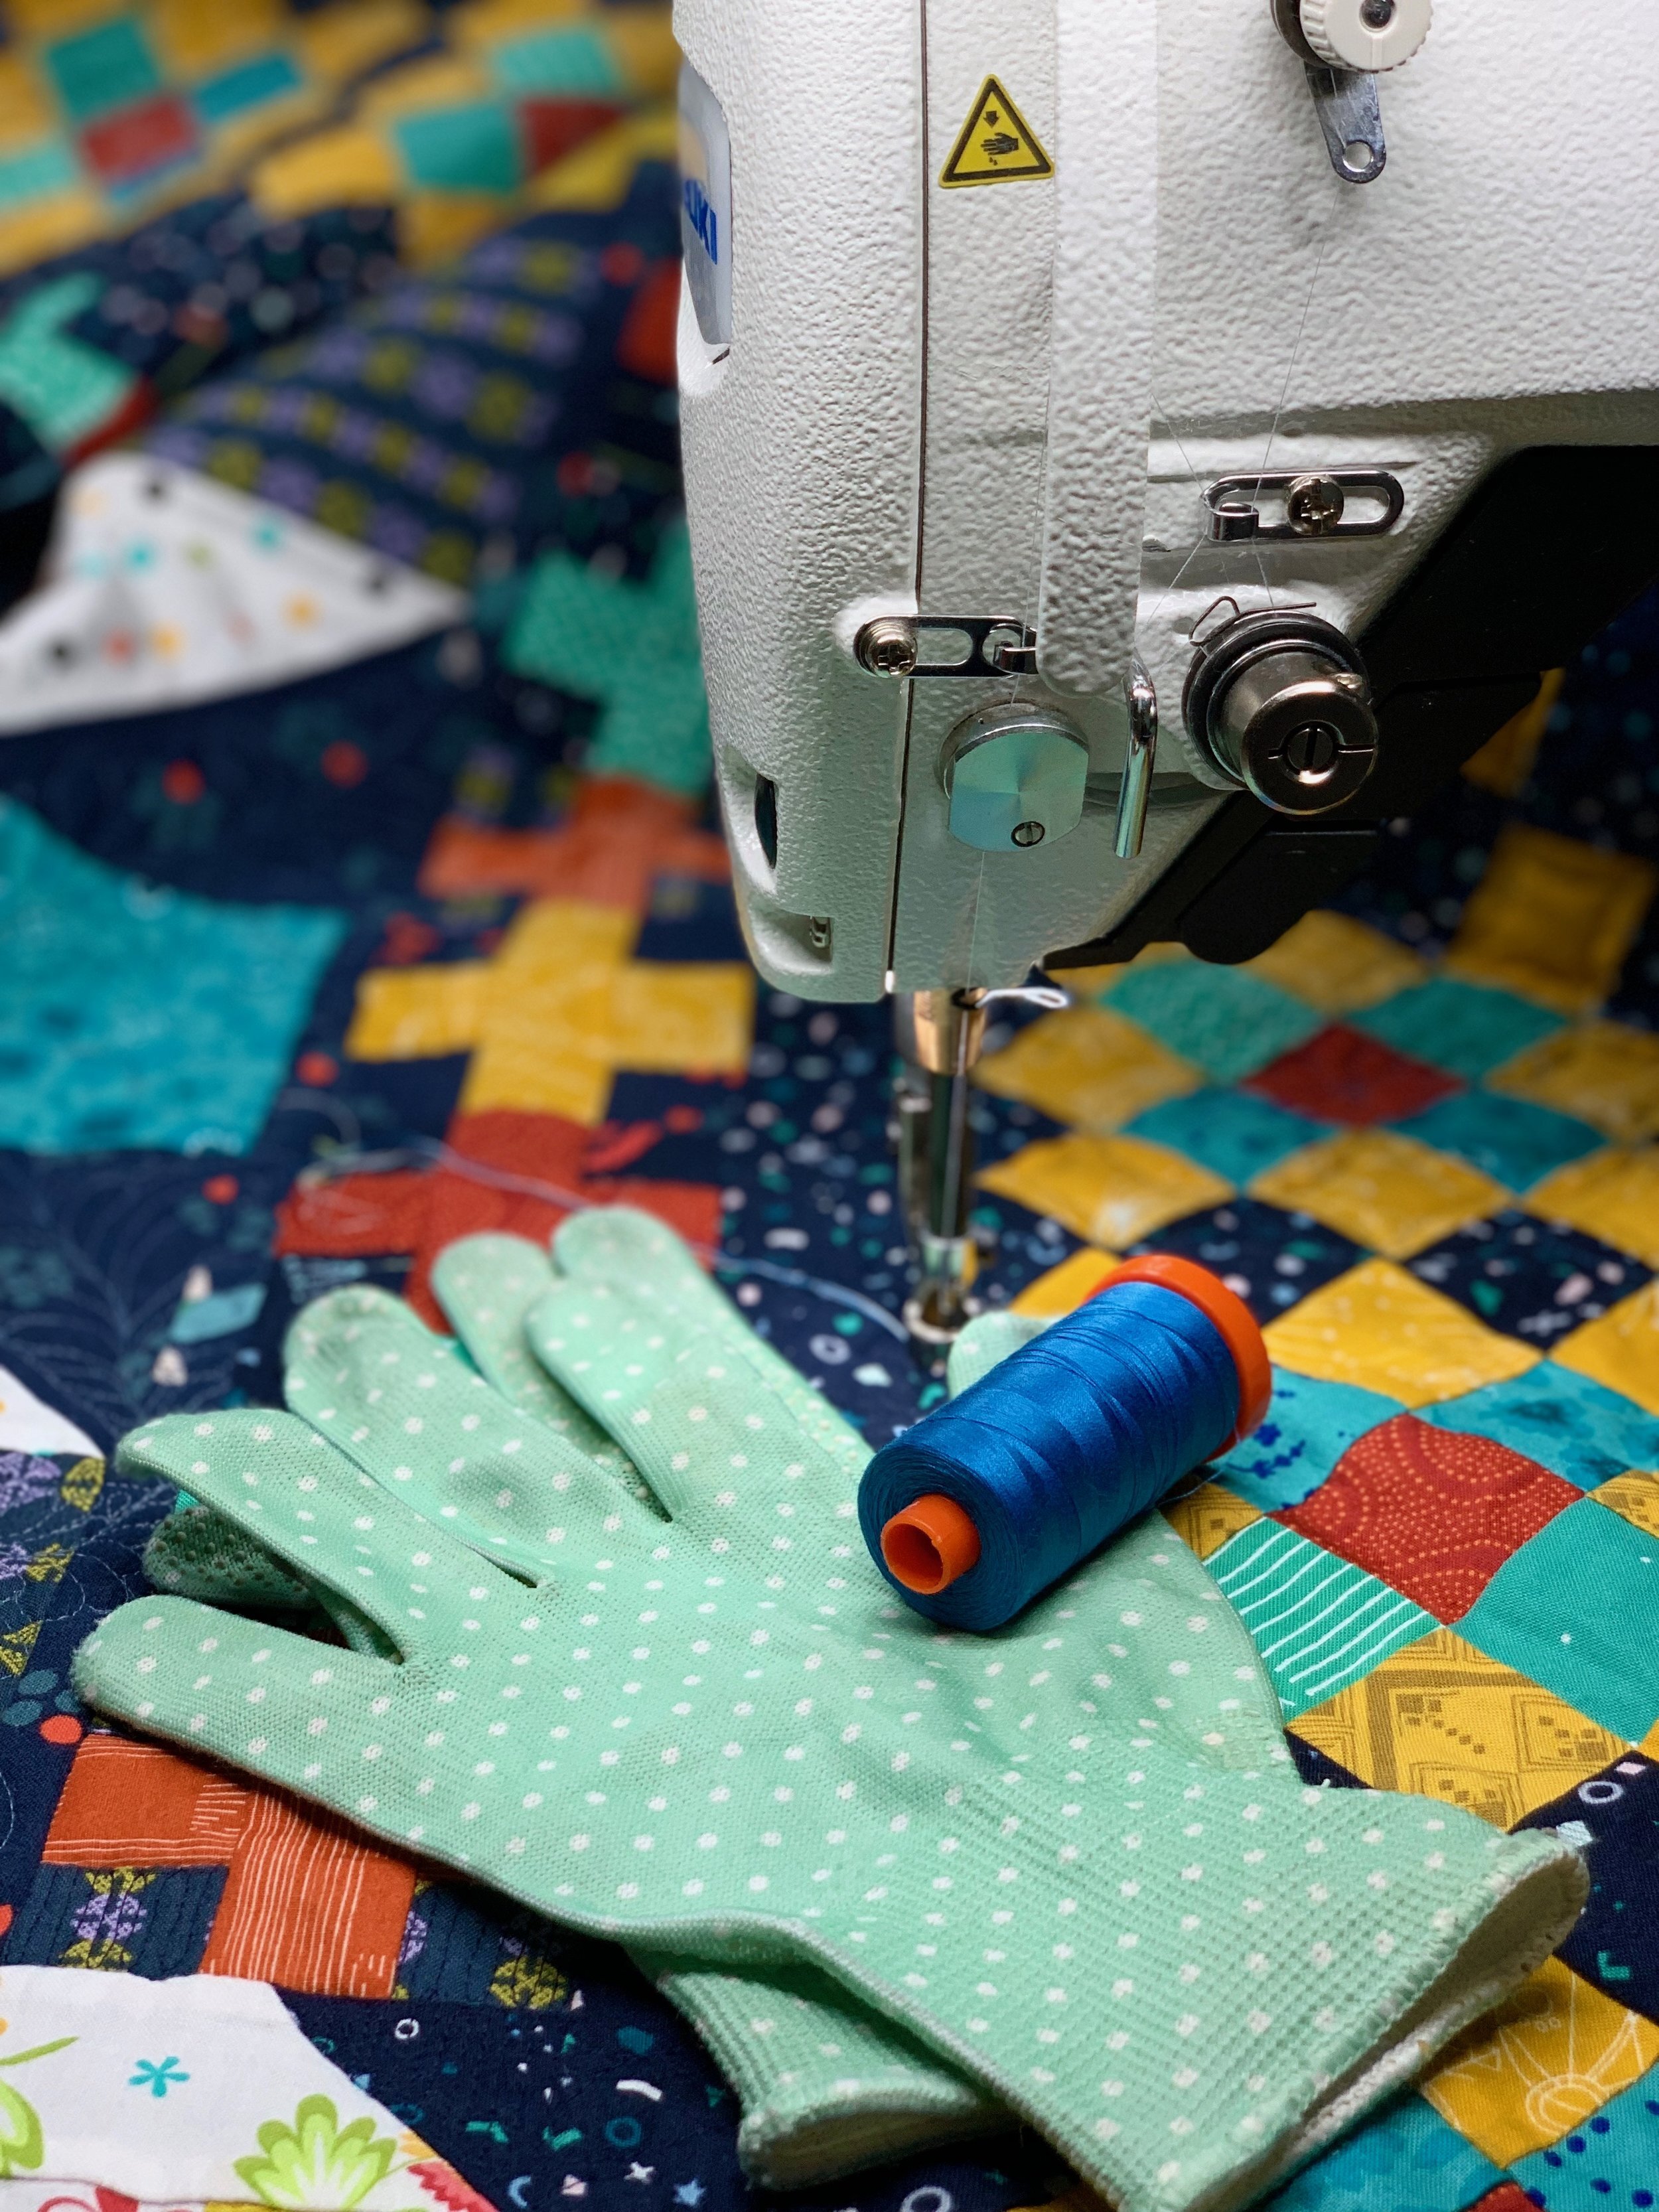
1) Supplies
Personally, I keep my supplies simple: Aurifil thread (usually 50wt), a size 11 or 14 universal or ball point needle (depending on the seam bulk and what I have on hand), a pair of grippy gloves, and a high quality light. I also consider dropping the feed dogs to be entirely optional (I never did on my Singer Quantum Stylist 9960, but my Juki J-150 QVP does automatically). If you need more help with the set up of free motion quilting, check out my best three tips here.

2) Set Up
Machine Position
The most important thing about your machine position is that it is secure and stable. If at all possible, having your machine set down in a table is ideal (I recommend this Arrow Sewing Cabinet for an affordable, portable option). Not only is this a lot easier on your shoulders and elbows (and makes it easier to adjust your chair to the proper height), but it will also make your machine more stable. If you have a smaller, lightweight machine like the Eversewn Sparrow 30 shown above, be careful that the weight and bulk of the quilt doesn’t push the machine over while you’re stitching. Setting the machine down in a table reduces the chances of it flipping over and reduces “bounce" if you get going real fast.
Quilt Support
One of the most frequent questions I get about machine quilting on the domestic is “What do I do with all that quilt??” This is a great question, and taking the time to make sure there is a place for the quilt to go as you work will contribute to your success. First, if you machine is not set down in a table, I highly recommend a “quilting table” which extends the bed of your machine for a larger, flatter quilting space. In addition, make sure you have as much table space as possible to the left and rear of your machine to hold the weight of the quilt. This will reduce strain on your body from trying to fight against gravity with the drag of the quilt, and it will reduce strain on your needle. Too much drag can lead to broken needles!
Chair Height
Make sure you are sitting up over your quilt. If you are on the shorter side, you may find the need to lift your foot pedal up on a box or stack of books in order to raise your chair up so that the edge of your quilting surface is at about belly button height (This means the quilting table, not the table table if your machine isn’t flush with your work surface). Your arms should be at a 90 degree or greater angle, not scrunched up against your body like dinosaur arms. Being up over your work will improve visibility and reduce shoulder, neck, and elbow strain and soreness over time.
(For more detailed instructions about quilting posture, check out this post)
3) Quilting
Start in the Center / Secure the Quilt
As you can imagine, the most challenging part of the quilt to tackle is the center because that’s when there is the most bulk in the throat of your machine. Thus, whenever possible, I recommend starting in the center to get it over with! Also, working from the center out helps ensure that any shifting (as seams flatten out, etc) happens evenly around the quilt rather than all to one side or corner. Sometimes, though, I know it’s hard to work your quilting plan to start in the center and move smoothly around the quilt. In these cases, I recommend taking the time to stitch in the ditch between blocks. Then, everything is nice and secure, and you can move around the quilt as desired.
Push and Shove, Everybody
As much as as I hate to break it to you, there’s not a graceful way to deal with the bulk of a quilt. I prefer to simply bunch and shove, encouraging as much of the quilt to fall behind, rather than in, the machine as possible. I know some people prefer to roll it, but I find that to be a royal pain in the you-know-what— both to make the roll in the first place, but also to manipulate and reposition as I move around the quilt.
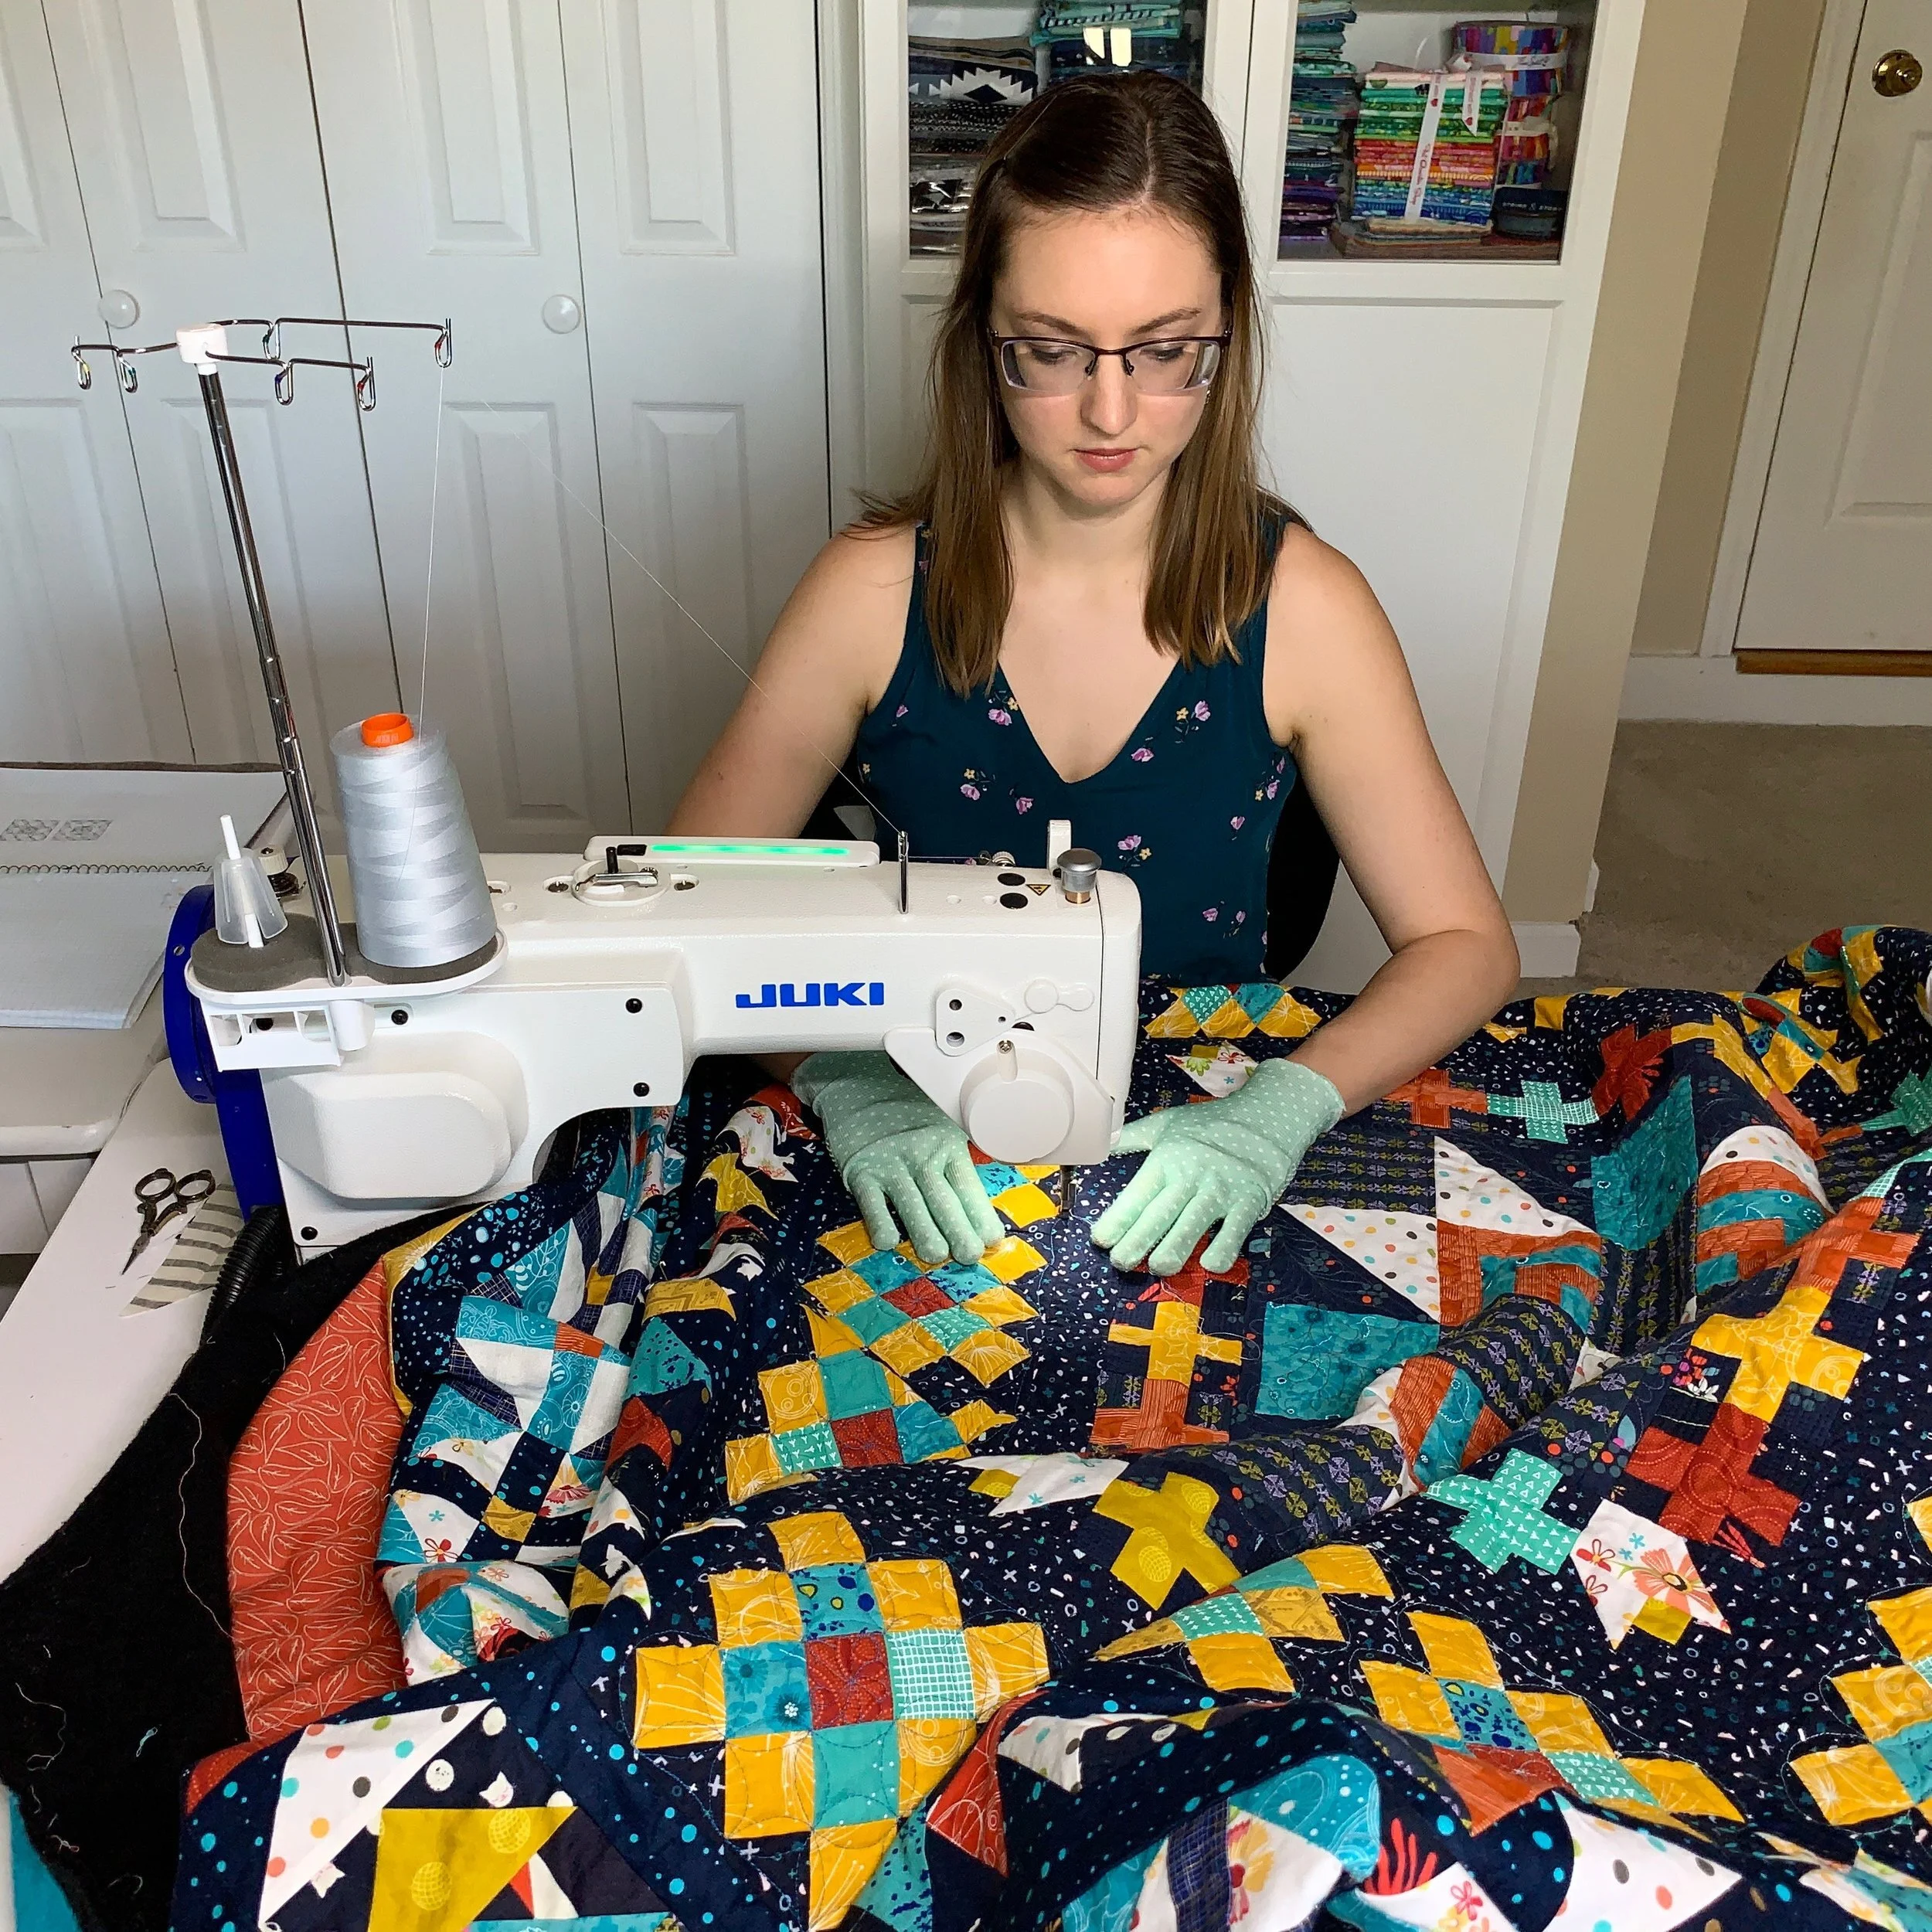
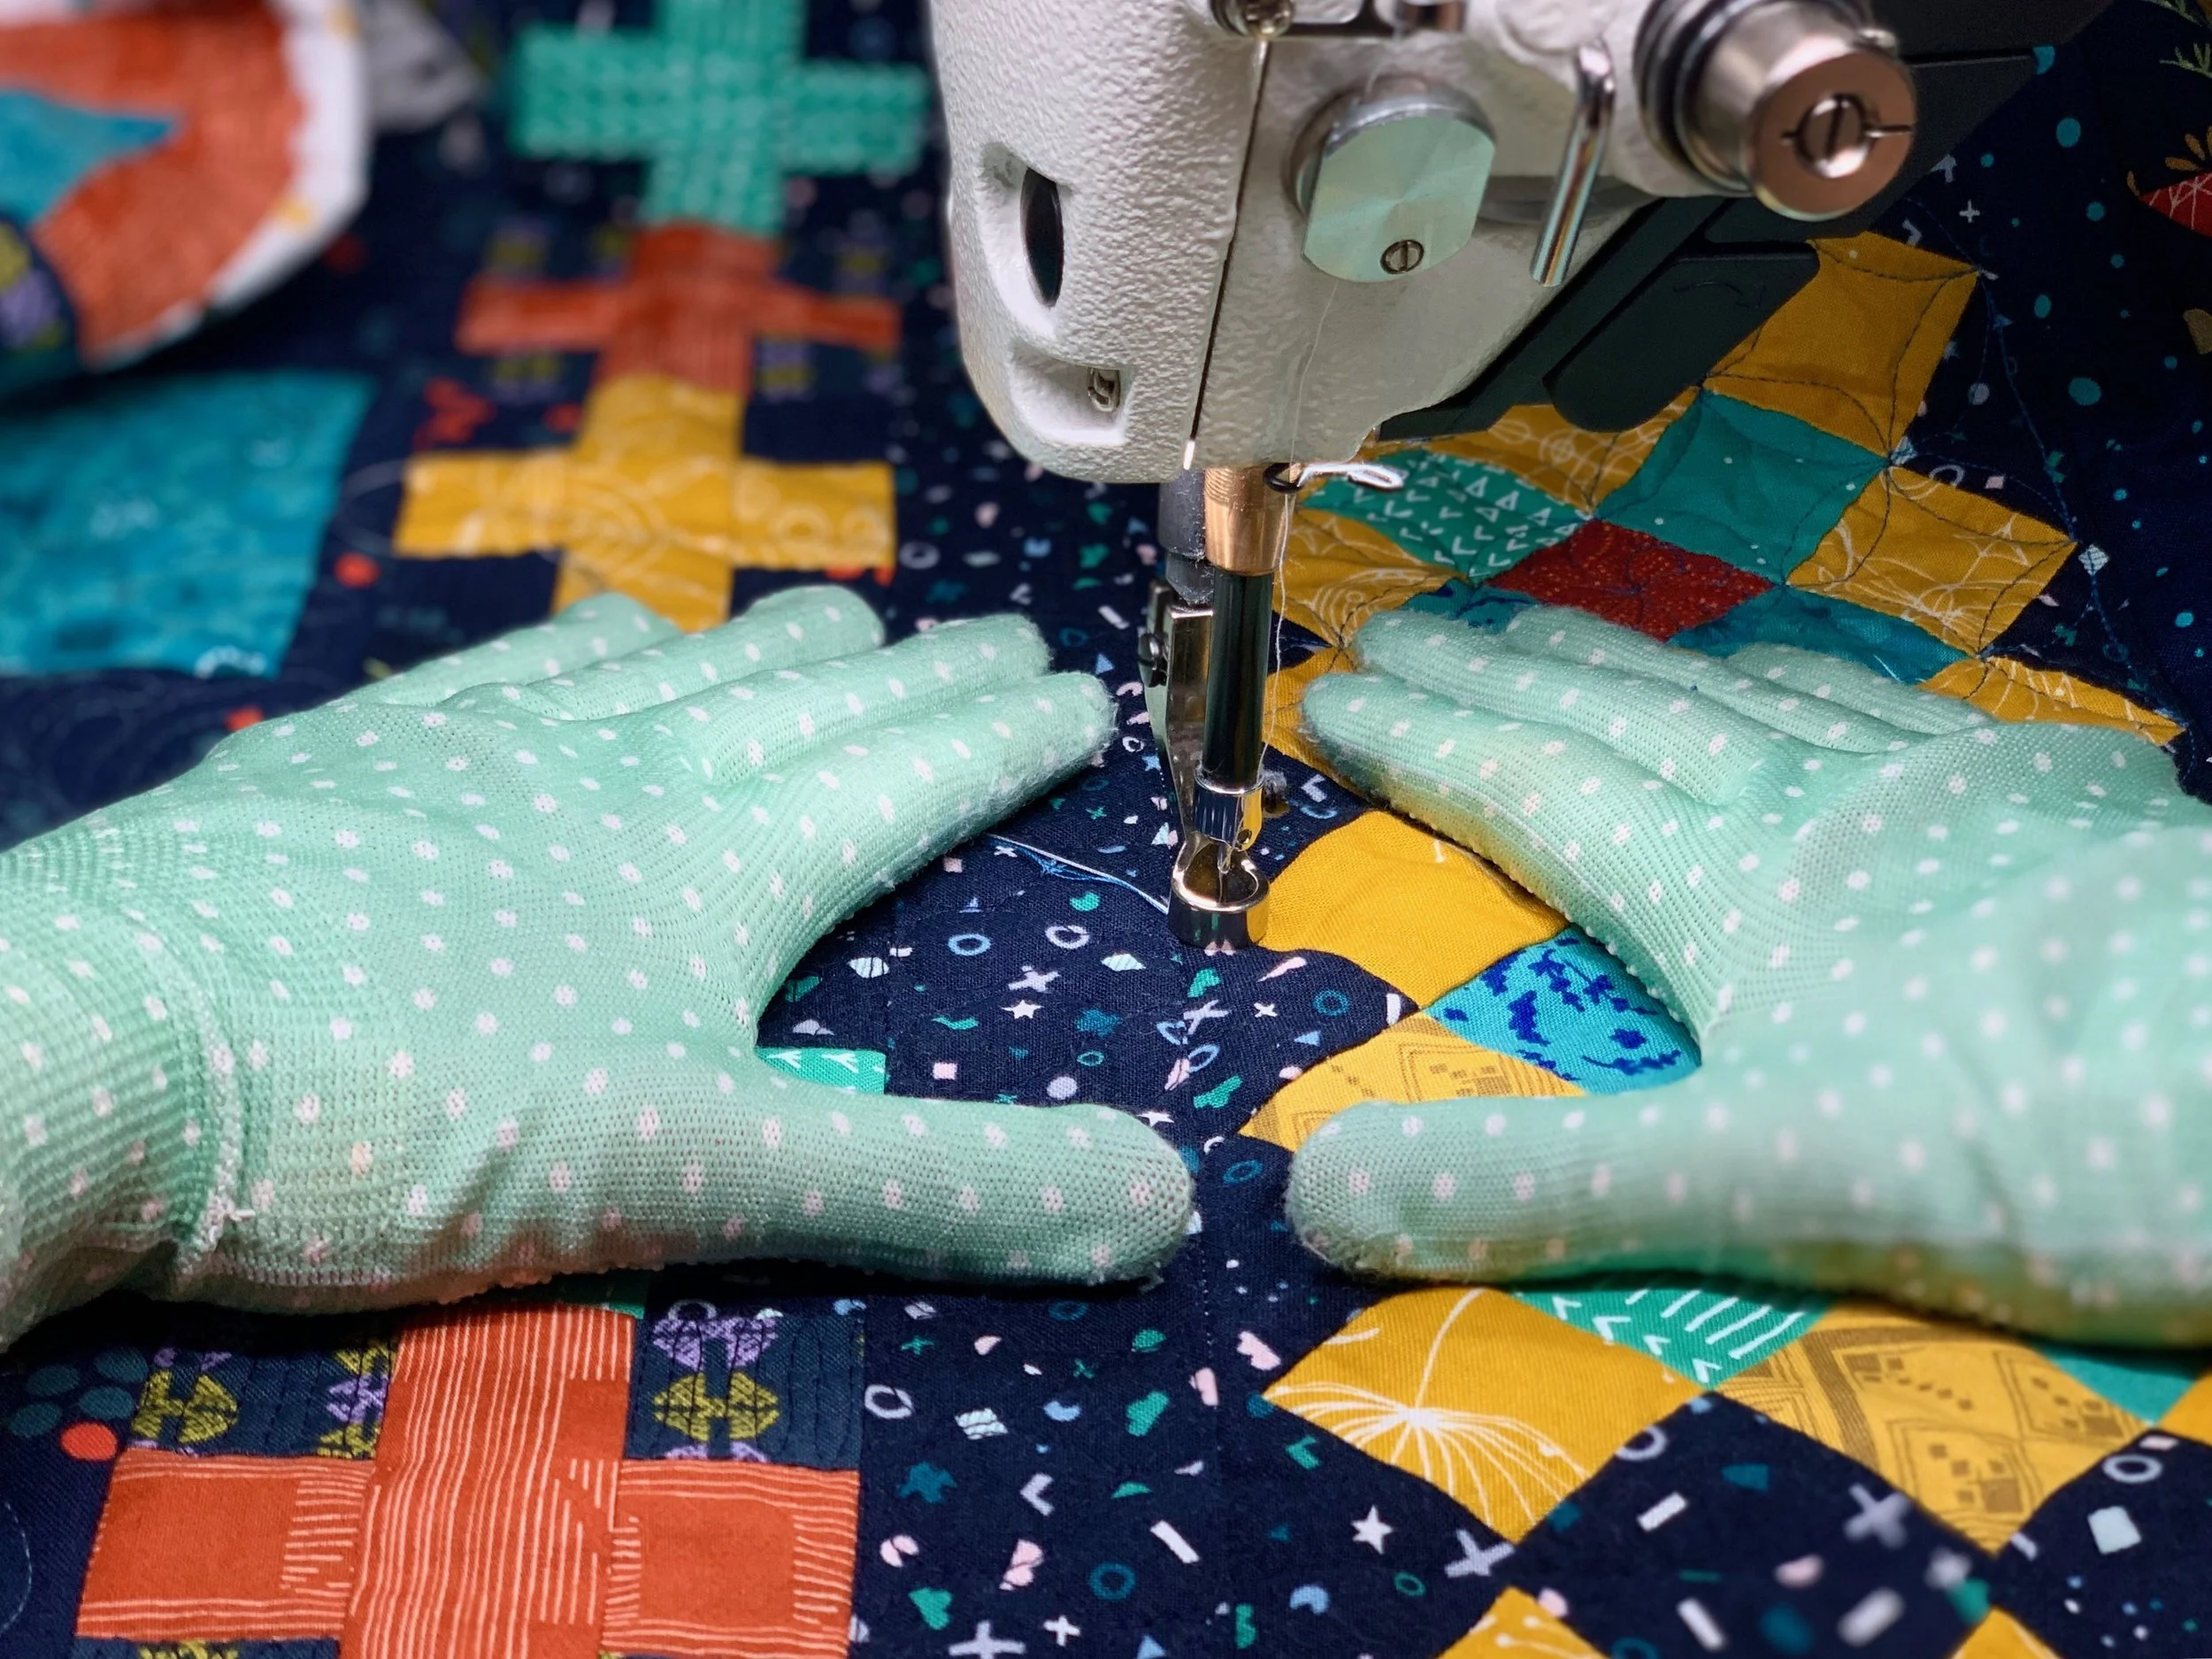
Work Small
I mean it. Work really small. At any point, the only area of the quilt you truly have control over is the 4 or 5 inch triangle that falls between your hands (see above). Your motifs can only be that big, and when you fill the area between your hands, it’s time to pause and reposition the quilt. Letting your work area get too big or drift too far to one side will hurt your body and affect your quilting.

4) Take Care of Your Body
Posture
Quilting is a full body sport, and taking the time to build healthy habits about how to hold and move your body while you are working. Learn how to sit over your hips, hold your back straight, and relax your shoulders. It may feel unnatural or uncomfortable at first, but, trust me, its better than an injury later! And, yes, you can actually injure yourself quilting. When I was getting started, I had poor habits to the point that my chiropractor asked if I had taken up a contact sport! Needless to say, I had some healing to do— and some new habits to develop. (Check out this blog post if you need some guidance about posture)
Break Often
I know it’s easy to get lost in the zone and not realize how long you’ve been quilting, especially if you’re eager to get ‘er done! But taking breaks is a vital part of protecting your body. Every hour or so (end of a TV episode or podcast, etc) get up and MOVE. Go to the bathroom, drink some water (seriously, hydrate like this is a sport), and gently stretch your body. This maintains good circulation in your legs, helps you reset your posture, shake out any tension, etc. (Check out this post and video for 5 hip flexor stretches to reduce hip and lower back pain associated with long periods of sitting)

Post-Quilting Care
This the “cool down” of your workout. Drink a lot of water, stretch your whole body, take a walk around the block, and massage a high quality muscle rub (I love doTERRA DeepBlue Rub) into your joints, especially shoulders and elbows. If you’re new to free motion quilting, I know this sounds “over the top,” but I have experienced and heard tell of too much physical pain caused by poor quilting habits, and I want you to love quilting and recover well!
Additional Resources
Clearly I have a lot of thoughts about large quilts and domestic machines. I wrote them all down to be helpful, hoping that you can find exactly your “pain point” in this post and discover a useful tip. But don’t get too bogged down in these details— the most important thing is to start! Take that big ol’ quilt a step at a time and embrace the journey. You’re a Quilting Rockstar— you’ve got this!
Finally, here are a few more resources on Free Motion Quilting you may enjoy:
Want more free motion quilting tips?
Join my free 12 Days of FMQ FAQ email series for answers to all the entry-level questions free motion quilters commonly have.
Share this blog if you found it helpful: