
Homemade Spray Baste
Trade precious dollars for a little patience and use this easy, cheap, and effective homemade spray baste!
(this post contains affiliate links)
Happy Tuesday!
As promised, I'm here today to talk about Homemade Spray Baste! When I mentioned this idea on Instagram last week, I was totally unprepared for the response it received. Clearly I am not the only one caught between a loathing of pin basting and the expense of spray basting. Oi!
You should know that while I had the idea that Homemade Spray Baste must be possible, this is not my recipe. It was first published on California Quilting, then Chatterbox Quilts made a video tutorial as well.
The RECIPE is simple
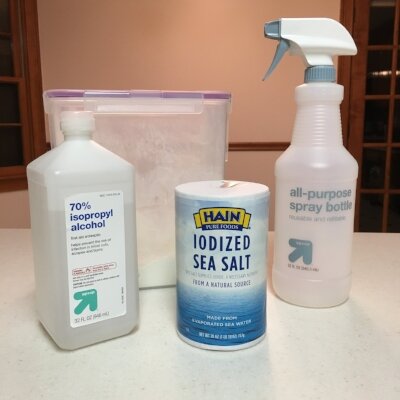
3 cups water
1 teaspoon salt
3 heaping tablespoons flour
1 cup rubbing alcohol (update: Vodka works too and makes the spray odorless!)
clean spray bottle (I bought one for about $3 in the cleaning section at Target; a well rinsed Best Press bottle would probably work, too)
Combine 2 cups water and 1 tsp salt in a pot and bring to a boil. Meanwhile, combine 1 cup water and 3 heaping tablespoons flour in a jar or well sealed tupperware, and shake to mix. When the water and salt boils, turn down to a gentle boil and add flour and water. Cook on medium-ish until the mixture thickens like gravy (stir it so it doesn't stick!). Remove from heat and let cool to room temperature (I poured mine out of the pot and into a pyrex mixing bowl with a spout, so it would be ready to pour into the spray bottle. When the mixture is cool, pour it into the spray bottle and add 1 cup rubbing alcohol. Shake well to mix.
THE VERDICT:
I like it. I'm not planning to buy aerosol baste again any time soon. I'll have to plan my projects so I have time for them to dry, but it will be well worth it to save so much money. I would highly recommend at least TRYING this baste, even if you have space limitations. (UPDATE August 15, 2017: I used this baste exclusively for 6 months and can now say I LOVE it. I never had any pleats or wrinkles in my quilts the whole time, and it washed out like a dream. I have a long arm now, so I baste much less, but this is still my go-to when I quilt on my domestic machine)
PROS:
Very cheap (I estimate about $0.75 per batch, and I basted a 80x80 quilt, several swatches, a mug rug, and I still have some left); Uses household ingredients; Relatively non-toxic; effective; the time related "downsides" are mostly idle time, so you an go piece your next quilt while the baste cools or dries
CONS:
Needs to dry before quilting (challenging if you're on a tight deadline or don't have a pet/kid/chaos free space to let it sit); alcohol stinks (make sure you have at least some air circulation); you have to remember to make it several hours before you need it so it has time to cool; I don't know if it would work for wall basting because the moisture would add a lot of weight. However, if you have a foam core wall covered with felt such that you can pin into it, then you might try it with smaller projects.

HOW I BASTED:
Lay out batting (I like to work on carpet because it holds the batting in place a bit), then lay out the quilt back on the batting.
Smooth out all the wrinkles.
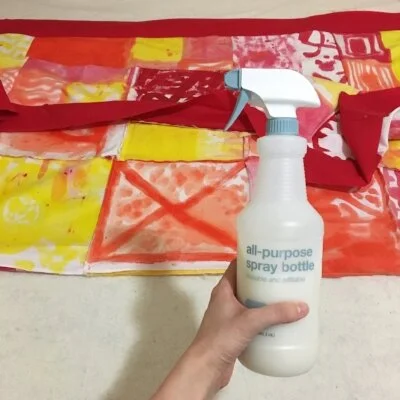
Fold half of the backing up and spray both the batting and underside of the backing generously (not dripping, but definitely damp).
Fold the backing back down and smooth again.
Repeat with the other half of the backing.
Let dry for an hour or two
Flip carefully and repeat the process with the top.
Then, let the whole thing sit overnight so that everything is stable and dry when you go to quilt. It is CRUCIAL that the baste be completely dry or it will still be sticky/ gunky/ goopy.
Note: I used about 20 oz (most of a batch) for a 80x80 quilt.

It's not trimmed or bound yet, but you can see it turned out pretty good. I used basic, (mostly) straight line quilting.
TIPS:
Always SHAKE WELL
Do the cooking part before you start dinner one night. Let it cool while you cook dinner and eat, then it should be ready about the time you're ready to settle into quilting for the night
Prime your spray bottle well. For the first twenty or more pumps, the mixture was goopy more like glue. Then it began to spray well.
Ironing can be used to speed the drying process on smaller items (I had a bit of iron gunking, but this was when my spray bottle was still putting out a thicker mixture rather than a spray-- see tip above about generous priming)
Reviews on the other blogs advise against letting a quilt sit too long after being basted with this method (like, don't let it sit months before you quilt and wash it) because one or two ladies found that mold grew after several months. PLEASE NOTE: I have several quilts that have been sitting for well over two months with no issues at all. Again, it’s critical to let the baste dry completely before quilting or storing the quilt.
I know one of the blogs suggested a warm water wash to remove the baste after quilting, but I used cold water and it worked just fine. But definitely wash your quilt when you are done quilting
Another review said that her interfacing came off when using this baste. I tested two that I had handy with swatches of knit fabric and did not experience any separation of the interfacing. I would recommend testing a swatch before basting a quilt if you are concerned, though.
The quilt is repositionable while the baste is damp, but once it dries, it would be a mess to pull apart.
Always shake your spray bottle before using. If the mixture gets goopy over time, either make a new batch or add more alcohol (depending on how long it has been sitting).
As with all my quilts, I still used some "anchor pins" every 12-18" or so. I do this with store bought baste too-- it just gives me some piece of mind that things can only get so wonky as I'm crinkling and shoving my big ol' quilt through my little Singer.
I tested this baste on swatches, a mug rug, and a fairly large quilt (about 80 inches square). The baste was overall excellent. I had a bit of trouble with the quilt top because it was painted fabric for a school auction quilt, and the seams are extremely bulky. The result was that the top did not lie flat enough for the baste to be fully effective as it dried. However, I still think I had fewer wrinkles while quilting with this one than I did with the other three like it, and I used store bought baste for those. All that to say, I'm not sure this was the best test project, and I think the flaws were with the quilt top, not the baste.
Now that your quilt is all basted, it's time to get to quilting! Check out The Confident FMQ Workbook to get started!
Share this blog if you found it helpful: