
How to Make Half Square Triangles
The humble half square triangle, or HST as it is often affectionately known, is one of the most foundational yet most versatile units in all of quilting. Let’s take a look at several ways to make this common quilt block unit.
(This post contains affiliate links)

From standing on its own to being used to create pinwheels, flying geese, diamonds, arrows, and more, the half-square triangle is essential to creative piecing in many quilts. Quilters covet "perfect points," where all the seams are sufficiently precise to create sharp points on all three tips of the triangle. Making and trimming accurately sized HSTs is critical, so let's look at several ways to do just that.
A quick note on terms:
-Unfinished is the size of the HST unit by itself BEFORE it is pieced into the quilt. This measurement includes seam allowances
-Finished is the size of the HST when it is pieced on all sides into the quilt top. This measurement does not include seam allowances.
Video Tutorial

Two at a Time
I think most quilters learn to make the HSTs this way first because it is straight forward and, when done properly, results in lovely HSTs. Begin with two squares that are 1 inch larger than the desired FINISHED HST size. Lay the two squares right sides together and mark one diagonal. Then, stitch 1/4" away from the marked line on each side. Cut along the marked line and press the HSTs open. Trim to unfinished size.
This method is wonderful... unless you need to make 47595 HSTs. For a high volume of HSTs, I recommend considering some other methods. If you don't like marking, I recommend a tool like the Clearly Perfect Angles template which gives you a stitching guide right on the bed of your machine rather than having to mark each individual pair of squares.

Four at a Time
This method is definitely quick, and I first encountered it on a tutorial for a quick finish quilt pattern. You'll take two squares, place them right sides together, and sew a quarter inch seam all the way around. Then, cut an X across the square to make four HSTs. This method creates bias edges on the triangles, so I recommend using lots of starch and being careful to PRESS and not iron when you open up the triangles. The math is a bit of a bear, so here's a quick chart for some common HST sizes.
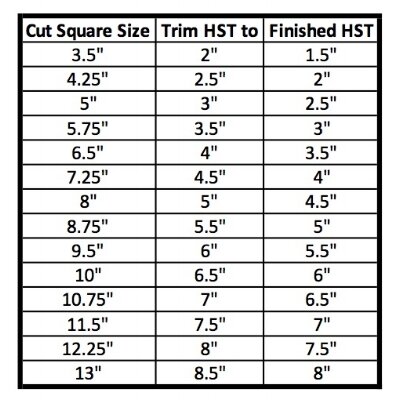
For those who really do want the math:
Cut Square Size = 2 x √((Finished HST Size + 3/4")^2 / 2) + 1/2"

Eight at a Time
I wish I had discovered (read: bothered to investigate and actually try) this method sooner! With only four seams, you make 8 beautiful HSTs lickety split. First, pair up your squares right sides together. Then, mark (or imagine if you are using the Clearly Perfect Angles Template) an X on the back of the squares. Sew 1/4" on each side of each line of the X (4 stitching lines total). Then, rotary cut the X as well as a + on the squares to yield 8 HSTs.
Fortunately, this math is pretty straight forward:
Cut Square Size = 2 x (Finished HST size + 1")

Using Your AccuQuilt Go!
If you have an AccuQuilt, this is a fast, accurate, and, with a bit of practice, low waste method to make half-square triangles. The AccuQuilt template conveniently removes the dog ears ahead of time, and if you put your fabrics right sides together, all you have to do is peel and sew!

Resources
The Half Square Triangle is a gorgeous unit and worth learning several ways to make. You might find that your favorite method depends on how much fabric you have handy (some methods require quite big squares!), how many HSTs you need, and what tools you have handy. I recommend trying all the ways to figure out your top two or three to "keep in your back pocket."