
How to Use a TOWA Bobbin Case Tension Gauge
Typically, sewing machine tension is adjusted only at the top by the sewist, but if you are working on a longarm or an industrial machine, you will want a TOWA gauge to check and adjust your bobbin tension, too! Join me as I share the ins and outs of what a TOWA bobbin case tension gauge is, as well as when and how to use it.
(this post contains affiliate links)
The key to balanced tension is the same as a key to a balanced chemical equation: remove all but one variable so that by tweaking that final variable, you can achieve the desired effect of gorgeous, crisp stitches. If you have heard me teach tension, you know that the final variable is the top tension or needle tension. This is the tension adjusted by your machine’s computerized panel or the knob on the front (click here if you are looking for general instruction on how to adjust sewing machine tension.). “All the other variables” includes things like making sure you have a new needle, that you’ve cleaned the bobbin race, and your machine is threaded correctly. But, if you are working on an industrial sewing machine or on a longarm, you’ll also want to check your bobbin tension as part of this “set up.”
Enter: The TOWA Bobbin Case Tension Gauge (scroll down for a video).
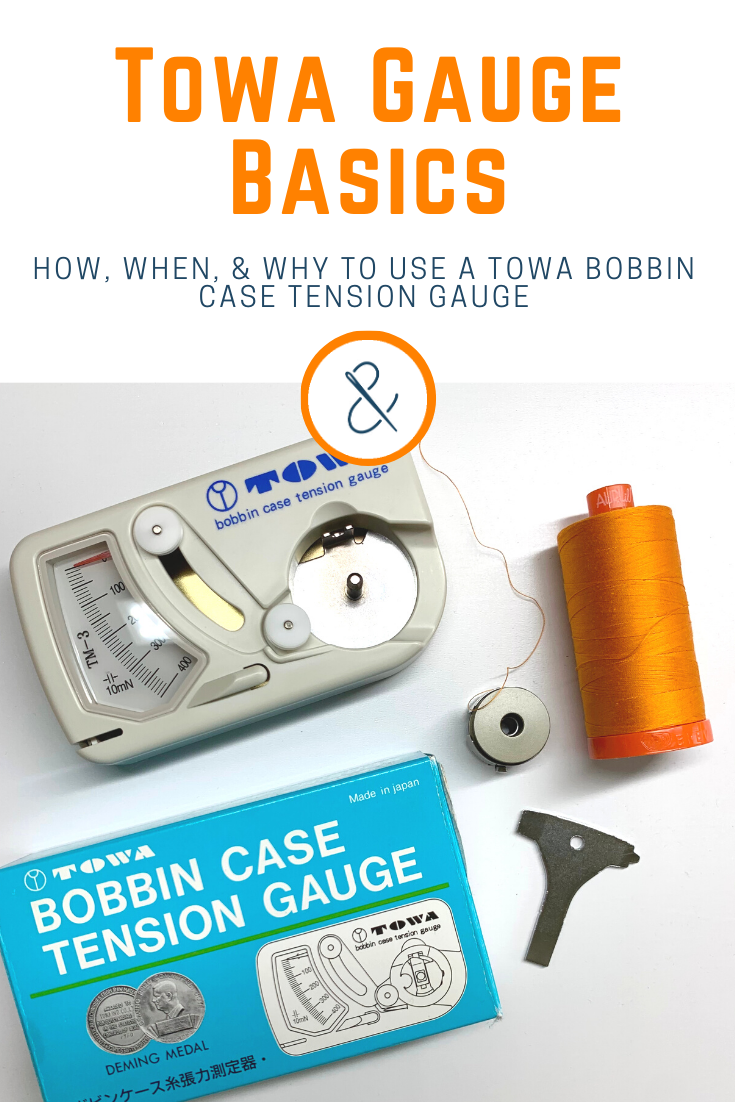
What is a TOWA Bobbin Case Gauge?
A TOWA Gauge is a tool that measures the bobbin case tension for industrial style machines (longarms, midarms, and actual industrial machines like my Juki J-150 QVP). Essentially, the metal case you put the bobbin in before you load the whole thing in your machine has a tiny screw on the side. This screw adjusts how much resistance is needed to pull the thread from the bobbin thru the case. The resistance is the bobbin tension.
The TOWA Gauge allows you to put the bobbin and casing into the tool, thread the springs, and see how much resistance is on the thread (in millinewtons, in case you were wondering). This is especially useful to know and appropriately adjust when:
a machine is new to you
you’re having unexplained tension issues and have tried all the “usual culprits”
you are changing thread weight in your bobbin
How do you use a TOWA Gauge?
Fortunately, while “adjusting the bobbin tension” may sound a bit terrifying, the TOWA Gauge makes it quick and easy:
Remove your bobbin case from your machine, and load your bobbin into it as usual
Insert the whole case into the TOWA Gauge on the spool, lining up the case latch with the notch at the top of the spool area, and listening for the “click”
The thread will be coming off the bottom of the casing: gently thread it under the first spring (capped with a white disk), then up and over the second
Guide the thread down and around the “hook” back at the bottom of the gauge. You’ll see the needle of the gauge begin to move
Gently pull the thread directly to the left with a steady pressure for 1-2 inches. You’ll see the needle pull down and become stead
The number where the needle is steady is your bobbin case tension. You want your bobbin case tension between 190 and 220 mN (I aim for right about 200 mN)
If your tension is not within that 190-220 mN range, use a tiny screwdriver to adjust the screw on the side of the casing (if there are two, you’ll adjust the larger screw). Turning to the right will increase the tension, and turning to the left will decrease it.
Once you’re tension is all set, return the bobbin and case to your machine, and adjust your needle tension from there.
Video
Conclusion
In short, a TOWA Bobbin Case Tension Gauge simplifies the tension adjusting process on longarm, midarm, and industrial machines, so you can get beautifully balanced stitches at all times, especially if you enjoy sewing and quilting with a variety of thread weights.
Share this blog if you found it helpful: